Versions Compared

Key

  • This line was added.
  • This line was removed.
  • Formatting was changed.

...

Expand
titleWith CAX

Contener connection and selection

  • Go onto the Commanders Act platform

  • Choose the appropriate container. It is essential that the tag is triggered on all landing pages.

Tags template selection

Capture d'écran 2023-03-13 115313-20240111-152136.png
  • Go to the step of choosing tag templates

  • Search for “Adloop” in the search bar

  • Choose the “Adloop Tracking and Attribution” template. You’ll be redirected to the editing step.

Template edition

Fill in the 3 following fields:

  • The custom(s) dimension(s) configured in your Analytics tool

    • If several, they should be separated by a comma ( , )

  • Subdomains that should be considered as a separate referrer

  • Referrers to be excluded (the list should be the same as the one in your Analytics tool), like payment platforms

image-20250218-150922.png

Consent

  • Set the consent for the Adloop tag (Analytics/Measurement category)

Publishing

  • Install the new “Adloop Tracking & Attribution” tag and place it in first position. There is no need to add some triggers (except Container loaded)

There are two ways to set up the custom dimensions:

  1. Using a function just before the page_view event

There is function that you can call anywhere you want. This function automatically fills the custom dimensions when using GTAG, GA or PA analytics objects.
It is mandatory to call this function just before the page view event and any other event (add_to_cart, purchase etc.)

Code Block
if(typeof window._ADLOOP_SET_CUSTOM_DIMENSIONS != "undefined"){
          window._ADLOOP_SET_CUSTOM_DIMENSIONS(true);
}
  1. Using the stored value

In case of a specific setup, it is also possible to set the custom dimensions manually (if the usual method doesn’t work, most probably because of the execution order of the Adloop tag).
It is mandatory to write this code just before the page view event and any other event.

a. For Piano Analaytics

The Adloop dimensions values are stored in a variable called (you write this in the console debugger of your browser if you want to see what’s inside) :

Code Block
window.__ADLOOP_VALUES__

For example (in this case, the example implements the queue system of Piano, ‘paq’) : 

Code Block
if(typeof(__ADLOOP_VALUES__) != "undefined" {
  var adloopValues = window.__ADLOOP_VALUES__
  window._paq.push(['setProperty', adloopValues.clickDimension, adloopValues.clickCode])
  window._paq.push(['setProperty', adloopValues.clickDimensionMeta, adloopValues.clickCodeMeta])
}

Notes for debugging:

There are some debugging logs for this new feature, that you can access in the console debugger of your browser.

For you to be able to see it, you need to create a new cookie for the website that you are setting up (using a browser extension, like Cookie Master)

The cookie must be named “tCdebugLib” and can have any value (1, for example).

With this cookie, you will see that kind of logs : 

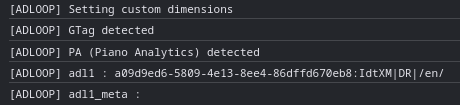
b. With GA4

In the pageview tag, add after the params var definition, add the following code:

Code Block
params[window.__ADLOOP_VALUES__['clickDimension']] = window.__ADLOOP_VALUES__['clickCode'];
params[window.__ADLOOP_VALUES__['clickDimensionMeta']] = window.__ADLOOP_VALUES__['clickCodeMeta'];

Expand
titleWith GTM
  • Make sure the Container ID is listed under the Build-In Variables

    • If not, click “Configure”, search for Container ID under “Utilities” and enable it

  • Go to the "Variables" section

  • According to the custom dimensions created earlier, create "User defined variables" following this scheme:

    • First one:

      • Type of variable: Data layer variable

      • Name of the data layer variable name : adloop_click_1

      • Give the variable an Adloop related name

    • Second one:

      • Type of variable: Data layer variable

      • Name of the data layer variable: adloop_click_1_meta

      • Give the variable an Adloop related name

  • Open the configuration of the GA4 Configuration tag (type: Google Tag)

  • In "Fields to Set”, click on "Add Row"

  • Fill in the following information:

    • Field Name: adloop_click_1

    • Value: Use the brick to choose the previously created variable (the 1st one)

    • Add another filed: adloop_click_1_meta

    • Value: Use the brick to choose the previously created variable (the 2nd one)

  • Go to the "Tags" section and add a new tag of type "Custom HTML", with the name "Adloop tag"

  • Copy and paste the content provided on the Adloop interface into the "HTML" field of the tag

  • Save the tag without trigger

  • Open the GA4 Configuration tag (type: Google Tag) that was opened in a previous step

  • In the advanced settings of this tag, in "Tag sequencing", check "Trigger a tag before this tag is triggered" and choose the "Adloop tag" previously created

  • For your GA4 events (purchase, add to cart, view item etc.) set-up on GTM, add the Adloop event parameters & values :

adloop_click_1 and for the value select the first user defined variable you created previously using the brick button

adloop_click_1_meta and for the value select the second user defined variable you created previously using the brick button

Note: the name of the value between {{ }} depends on how you named your user defined variable ; it might be different from the screenshot above.

  • Check that all your events (add to cart, purchase etc.) are triggered after the pageview is sent. Otherwise our script won’t be able to catch those events.

  • Deploy the new version

...

Expand
titleWithout GTM: gtag.js

Expand
titleWith Shopify + Google Analytics 4

First, ensure that your Shopify site is properly connected to your Google Analytics account.


In your Shopify admin, go to Online Store > Preferences, then locate the Google Analytics section. Click on Manage Pixel.
The configuration should look similar to the following screenshot (in French):

Image Added

Go to Adloop and copy-paste the script.

Go to your Adloop space, and go to the settings of your Adloop Tracking & Attribution data-source.

Once your setup is complete, go to the step “JS file and collect - Generate the script”, and use the button Copy in clipboard”.

Image AddedImage Added

In your Shopify administration, go to Online Store > Themes, then in the section for your current theme, click the button to the left of Customize (…), and select Edit Code.

Image Added

Select the theme.liquid file and locate the closing </head> tag.

Just before the tag </head>, paste the code you copied in the previous step.

Verification

Once the setup is complete, here’s how to check if everything is working correctly.

  1. No JavaScript errors in the browser’s developer console (F12),

  2. Search for your website on Google and click on one of the links. Check that a “loop_num” cookie has been created. The value should look like: 

b3523d6c-4f6b-40b2-ff18-61d1c046d67:AHK7n4|IN|site.com”.

  1. In the “collect” request sent to Google during the page_view, check that the custom dimension is correctly populated.

Image Added

  1. 24 hours later, you should see custom dimension values appear in the Google Analytics interface.

    Image Added

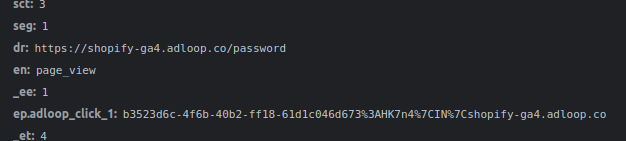
The verification of the script is very easy and will take only a couple of minutes.

If you have a preview mode, use it before publishing !

  • In GTM, using the preview mode

  • In CAX, using chrome or resource override extension

Click on the F12 button of your computer or right-click > Inspect to open the Console and go to the Network tab. In the filter box, type :

...