JS file parameters
Choose your implementation in this step.

Script generation
The script is generated at the next step, based on the information given in the previous steps.
Cookie consent set-up
Before installing the Adloop tag on your website, please not that the Adloop tag is not exempt from users' consent. Our tag is first party and falls under the “Statistical” category, just like your Analytics tag.
Please take that into account when you set-up our tag!
Installation instructions
Contener connection and selection
Go onto the Commanders Act platform
Choose the appropriate container. It is essential that the tag is triggered on all landing pages.
Tags template selection

Go to the step of choosing tag templates
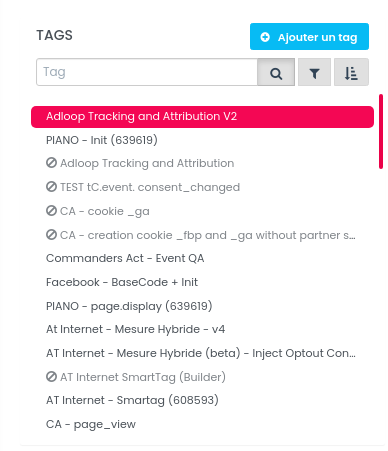
Search for “Adloop” in the search bar
Choose the “Adloop Tracking and Attribution” template. You’ll be redirected to the editing step.
Template edition
Fill in the 3 following fields:
The custom(s) dimension(s) configured in your Analytics tool
If several, they should be separated by a comma ( , )
Subdomains that should be considered as a separate referrer
Example: blog.website.com is not be considered as internal but as a referrer
Referrers to be excluded (the list should be the same as the one in your Analytics tool), like payment platforms

Consent
Set the consent for the Adloop tag (Analytics/Measurement category)
Publishing
Install the new “Adloop Tracking & Attribution” tag and place it in first position. There is no need to add some triggers (except Container loaded)
There are two ways to set up the custom dimensions:
Using a function just before the page_view event
There is function that you can call anywhere you want. This function automatically fills the custom dimensions when using GTAG, GA or PA analytics objects.
It is mandatory to call this function just before the page view event and any other event (add_to_cart, purchase etc.)
if(typeof window._ADLOOP_SET_CUSTOM_DIMENSIONS != "undefined"){
          window._ADLOOP_SET_CUSTOM_DIMENSIONS(true);
}
Using the stored value
In case of a specific setup, it is also possible to set the custom dimensions manually (if the usual method doesn’t work, most probably because of the execution order of the Adloop tag).
It is mandatory to write this code just before the page view event and any other event.
a. For Piano Analaytics
The Adloop dimensions values are stored in a variable called (you write this in the console debugger of your browser if you want to see what’s inside) :
window.__ADLOOP_VALUES__
For example (in this case, the example implements the queue system of Piano, ‘paq’) :
if(typeof(__ADLOOP_VALUES__) != "undefined" {
  var adloopValues = window.__ADLOOP_VALUES__
  window._paq.push(['setProperty', adloopValues.clickDimension, adloopValues.clickCode])
  window._paq.push(['setProperty', adloopValues.clickDimensionMeta, adloopValues.clickCodeMeta])
}
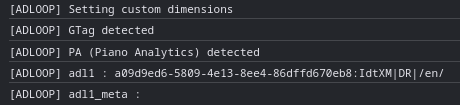
Notes for debugging:
There are some debugging logs for this new feature, that you can access in the console debugger of your browser.
For you to be able to see it, you need to create a new cookie for the website that you are setting up (using a browser extension, like Cookie Master)

The cookie must be named “tCdebugLib” and can have any value (1, for example).
With this cookie, you will see that kind of logs :
b. With GA4
In the pageview tag, add after the params var definition, add the following code:
params[window.__ADLOOP_VALUES__['clickDimension']] = window.__ADLOOP_VALUES__['clickCode'];
params[window.__ADLOOP_VALUES__['clickDimensionMeta']] = window.__ADLOOP_VALUES__['clickCodeMeta'];
Make sure the Container ID is listed under the Build-In Variables
If not, click “Configure”, search for Container ID under “Utilities” and enable it
Go to the "Variables" section
According to the custom dimensions created earlier, create "User defined variables" following this scheme:
First one:
Type of variable: Data layer variable
Name of the data layer variable name : adloop_click_1
Give the variable an Adloop related name

Second one:
Type of variable: Data layer variable
Name of the data layer variable: adloop_click_1_meta
Give the variable an Adloop related name

Open the configuration of the GA4 Configuration tag (type: Google Tag)
In "Fields to Set”, click on "Add Row"
Fill in the following information:
Field Name: adloop_click_1
Value: Use the brick to choose the previously created variable (the 1st one)
Add another filed: adloop_click_1_meta
Value: Use the brick to choose the previously created variable (the 2nd one)

Go to the "Tags" section and add a new tag of type "Custom HTML", with the name "Adloop tag"
Copy and paste the content provided on the Adloop interface into the "HTML" field of the tag
Save the tag without trigger

Open the GA4 Configuration tag (type: Google Tag) that was opened in a previous step
In the advanced settings of this tag, in "Tag sequencing", check "Trigger a tag before this tag is triggered" and choose the "Adloop tag" previously created
For your GA4 events (purchase, add to cart, view item etc.) set-up on GTM, add the Adloop event parameters & values :

adloop_click_1 and for the value select the first user defined variable you created previously using the brick button
adloop_click_1_meta and for the value select the second user defined variable you created previously using the brick button

Note: the name of the value between {{ }} depends on how you named your user defined variable ; it might be different from the screenshot above.
Check that all your events (add to cart, purchase etc.) are triggered after the pageview is sent. Otherwise our script won’t be able to catch those events.
Deploy the new version


The verification of the script is very easy and will take only a couple of minutes.
If you have a preview mode, use it before publishing !
In GTM, using the preview mode
In CAX, using chrome or resource override extension
Click on the F12 button of your computer or right-click > Inspect to open the Console and go to the Network tab. In the filter box, type :
collect? if you use GA4
xiti if you use Piano Analytics

Then reload your page using CTRL+R, still with the Console being open.
Find the first hit (pageview) after accepting the cookies.

In the Payload tab, scroll down until you find the custom dimension you created :
ep.adloop_click_1 for GA4
adl1 for Piano Analytics
Now, the custom dimension that you created should be filled with an Adloop code, that looks like this:
4a7be6b2-2e48-4879-8756-d5ecdb16c195:JGMaP|SOu|GG:/fr-fr/
Check the value between the first two | | :
If you came through a natural search engine result : |SOu|
If you came through direct : |DR|
If you came through a link with tracking parameters : |UN|
Check several pages of the website, the custom dimension should be triggered and populated for each page view. Try also to trigger a couple of events, our custom dimension should be triggered and populated for each as well.
If that is not the case, check the set-up of the tag. Check carefully once again that you followed every step of our Adloop script installation guide. You can also contact our Customer Success team that will be able to assist you with the script installation!
If all seems good, you can publish our script.
There is another alternative way to check if your script Is being triggered
This method only works when Google Analytics is used asynchronously
On your website:
Open web console > F12 or right-click and click on the inspect element.
A window like this will open up at the bottom of the page.

Click on console and type ga.q

In the ‘set’ section you can find our custom dimension, after clicking on the 1st line to open.
Checking the data collection
The script was correctly triggered in the preview? Great! But that is not the only thing you need to check when installing the Adloop script. You need to check that we are getting all the data from your site.
This verification step can only be done after the Adloop script has been installed for a full day!
If the script is installed on a Monday, you can do the checking only on Wednesday for Tuesday’s data.
Also, if you have discrepancies, please keep in mind that Google Analytics data can change for the last 48 hours. If you have small discrepancies, especially on the revenue & transactions metrics, please check data that is more than 48 hours old, as it can explain most of the small discrepancies.
Go to the Explore section to create a custom report

Create a new table report using the blank canvas.
In the dimension, select:
the adloop_click_1 dimension
event name
In the events, select:
event count
event value
transactions
Filter on the event name to include only your purchase event :

The amount of events attached to a (not set) Adloop custom dimension must be very low. We allow a tolerance of 5%.
The same check must be performing for all the events that you track: pageviews, add to cart, product page view etc. That way we are sure that our script is triggered as it should on every page.
Open the Data Query section of Piano
Lines : the Adloop custom dimension you created, Events
Columns: Events
Date: From the first full day of data-collection
Be careful to display N/A lines

Compare the number of events attached to an Adloop value to the global number of events on your website for each event. The amount of N/A for each event has to be very low.
The amounts should be very close - we allow a tolerance of 5%.
Please note! If Piano works in consent mode, please filter the data to only compare when consent is given. Otherwise, since Adloop can only work with the consent of the user, you won’t have the same basis for data comparison.